Assignment #3 - When Cats meet GANs
Download: [attachment]
Late Policy
- You have free 5 late days.
- You can use late days for assignments. A late day extends the deadline 24 hours.
- Once you have used all 5 late days, the penalty is 10% for each additional late day.

(Results are generated by this work)
Introduction
In this assignment, you will get hands-on experience coding and training GANs. This assignment includes two parts: in the first part, we will implement a specific type of GAN designed to process images, called a Deep Convolutional GAN (DCGAN). We will train the DCGAN to generate grumpy cats from samples of random noise. In the second part, we will implement a more complex GAN architecture called CycleGAN for the task of image-to-image translation (described in more detail in Part 2). We will train the CycleGAN to convert between different types of two kinds of cats (Grumpy and Russian Blue), and between apples and oranges. In both parts, you will gain experience implementing GANs by writing code for the generator, discriminator, and training loop, for each model. Code and data can be found here.
Part 1: Deep Convolutional GAN
For the first part of this assignment, we will implement a slightly modified version of Deep Convolutional GAN (DCGAN). A DCGAN is simply a GAN that uses a convolutional neural network as the discriminator, and a network composed of transposed convolutions as the generator. In the assignment, instead of using transposed convolutions, we will be using a combination of a upsampling layer and a convoluation layer to replace transposed convolutions. To implement the DCGAN, we need to specify three things: 1) the generator, 2) the discriminator, and 3) the training procedure. We will develop each of these three components in the following subsections.
Implement Data Augmentation [5 points]
DCGAN will perform poorly without data augmentation on a small-sized dataset because the discriminator can easily overfit to a real dataset. To rescue, we need to add some data augmentation such as random crop and random horizontal flip.
You need to fill in deluxe version of data augmentation in data_loader.py. We provide some script for you to begin with. You need to compose them into a transform object which is passed to CustomDataset.
    elif opts.data_preprocess == 'deluxe':
        # add addtional data augmentation here
        # load_size = int(1.1 * opts.image_size)
        # osize = [load_size, load_size]
        # transforms.Resize(osize, Image.BICUBIC)
        # transforms.RandomCrop(opts.image_size)
        # transforms.RandomHorizontalFlip()
        pass
Implement the Discriminator of the DCGAN [10 points]
The discriminator in this DCGAN is a convolutional neural network with the following architecture:
- Padding: In each of the convolutional layers shown above, we downsample the spatial dimension of the input volume by a factor of 2. Given that we use kernel size K = 4 and stride S = 2, what should the padding be? Write your answer on your website, and show your work (e.g., the formula you used to derive the padding).
- Implementation: Implement this architecture by filling in the
__init__andforwardmethod of theDCDiscriminatorclass inmodels.py, shown below. Theconv_dimargument does not need to be changed unless you are using larger images, as it should specify the initial image size.def __init__(self, conv_dim=64): super(DCDiscriminator, self).__init__() ########################################### ## FILL THIS IN: CREATE ARCHITECTURE ## ########################################### # self.conv1 = conv(...) # self.conv2 = conv(...) # self.conv3 = conv(...) # self.conv4 = conv(...) # self.conv5 = conv(...) def forward(self, x): """Outputs the discriminator score given an image. Input ----- x: BS x 3 x 64 x 64 Output ------ out: BS x 1 x 1 x 1 """ ########################################### ## FILL THIS IN: FORWARD PASS ## ########################################### pass
Note: The function conv in models.py has an optional argument norm: if norm
is none, then conv simply returns a torch.nn.Conv2d layer; if norm is instance/batch, then conv returns a network block that consists of a Conv2d layer followed by a torch.nn.InstanceNorm2d/BatchNorm2d layer. Use the conv function in your implementation.
Generator [10 points]
Now, we will implement the generator of the DCGAN, which consists of a sequence of upsample+convolutional layers that progressively upsample the input noise sample to generate a fake image. The generator in this DCGAN has the following architecture:
- Implementation: Implement this architecture by filling in the
__init__andforwardmethod of theDCGeneratorclass inmodels.py. Note: Use theup_convfunction (analogous to theconvfunction used for the discriminator above) in your generator implementation. We find that for the first layer (up_conv1) it is better to directly apply convolution layer without any upsampling to get 4x4 output. To do so, you’ll need to think about what you kernel and padding size should be in this case. Feel free to usup_convfor the rest of the layers.
Training Loop [10 points]
Next, you will implement the training loop for the DCGAN. A DCGAN is simply a GAN with a specific type of generator and discriminator; thus, we train it in exactly the same way as a standard GAN. The pseudo-code for the training procedure is shown below. The actual implementation is simpler than it may seem from the pseudo-code: this will give you practice in translating math to code.
- Implementation: Open up the file
vanilla_gan.pyand fill in the indicated parts of thetraining_loopfunction, starting at the line where it says:# FILL THIS IN # 1. Compute the discriminator loss on real images # D_real_loss = ...There are 5 numbered bullets in the code to fill in for the discriminator and 3 bullets for the generator. Each of these can be done in a single line of code, although you will not lose marks for using multiple lines.
Differentiable Augmentation [5 points]
To further improve the data efficiency of GANs, one can apply differentiable augmentations discussed in this paper. Similar to the previous data augmentation scheme, the idea is to reduce overfitting in the discriminators by applying augmentation, but this time we apply augmentation to both the real and fake images during training time. The differentiable augmentation code is provided in the file diff_augment.py, and you will be applying the code to DCGAN your training. In the write up, please show results with and without applying differentiable augmentations, and discuss the difference between two augmentation schemes we discussed, in terms of implementation and effects.
Experiment [10 points]
- Train the DCGAN with the command:
python vanilla_gan.pyThe script saves the output of the generator for a fixed noise sample every 200 iterations throughout training; this allows you to see how the generator improves over time. Include the following in your website:
- Screenshots of discriminator and generator training loss with
--data_preprocess=basic,--data_preprocess=deluxe. For each--data_preprocessflag, also show results trained both with and without differentiable augmentation, so you will show 8 curves in total. Briefly explain what the curves should look like if GAN manages to train. - With
--data_preprocess=deluxeand differentiable augmentation enabled, show one of the samples from early in training (e.g., iteration 200) and one of the samples from later in training, and give the iteration number for those samples. Briefly comment on the quality of the samples, and in what way they improve through training.
- Screenshots of discriminator and generator training loss with
Part 2: CycleGAN
Now we are going to implement the CycleGAN architecture.
Data Augmentation
Remember to set the --data_preprocess flag to deluxe or feel free to add differentiable augmentation or your additional data augmentation.
Generator [10 points]
The generator in the CycleGAN has layers that implement three stages of computation: 1) the first stage encodes the input via a series of convolutional layers that extract the image features; 2) the second stage then transforms the features by passing them through one or more residual blocks; and 3) the third stage decodes the transformed features using a series of transposed convolutional layers, to build an output image of the same size as the input.
The residual block used in the transformation stage consists of a convolutional layer, where the input is added to the output of the convolution. This is done so that the characteristics of the output image (e.g., the shapes of objects) do not differ too much from the input.
Implement the following generator architecture by completing the __init__ method of the CycleGenerator class in models.py.
def __init__(self, conv_dim=64, init_zero_weights=False):
     super(CycleGenerator, self).__init__()
    ###########################################
    # 1. Define the encoder part of the generator
    # self.conv1 = ...
    # self.conv2 = ...
    # 2. Define the transformation part of the generator
    # self.resnet_block = ...
    # 3. Define the decoder part of the generator
    # self.up_conv1 = ...
    # self.up_conv2 = ...
To do this, you will need to use the conv and up_conv functions, as well as the ResnetBlock class, all provided in models.py.
Note: There are two generators in the CycleGAN model, \(G_{X\to Y}\) and \(G_{Y\to X}\), but their implementations are identical. Thus, in the code, \(G_{X\to Y}\) and \(G_{Y\to X}\) are simply different instantiations of the same class.
PatchDiscriminator [10 points]
CycleGAN adopts a patch-based discriminator. Instead of directly classifying an image to be real or fake, it classifies the patches of the images, allowing CycleGAN to model local structures better. To achieve this effect, you will want the discriminator to produce spatial outputs (e.g., 4x4) instead of a scalar (1x1). We ask you to implement this discriminator architecture by completing the PatchDiscriminator class in models.py. It turns out this can be done by slightly modifying the DCDiscriminator class. (Hint: You can implement a PatchDiscriminator essentially by removing a layer from the DCDiscriminator.)
CycleGAN Training Loop [10 points]
Finally, we will implement the CycleGAN training procedure, which is more involved than the procedure in Part 1.
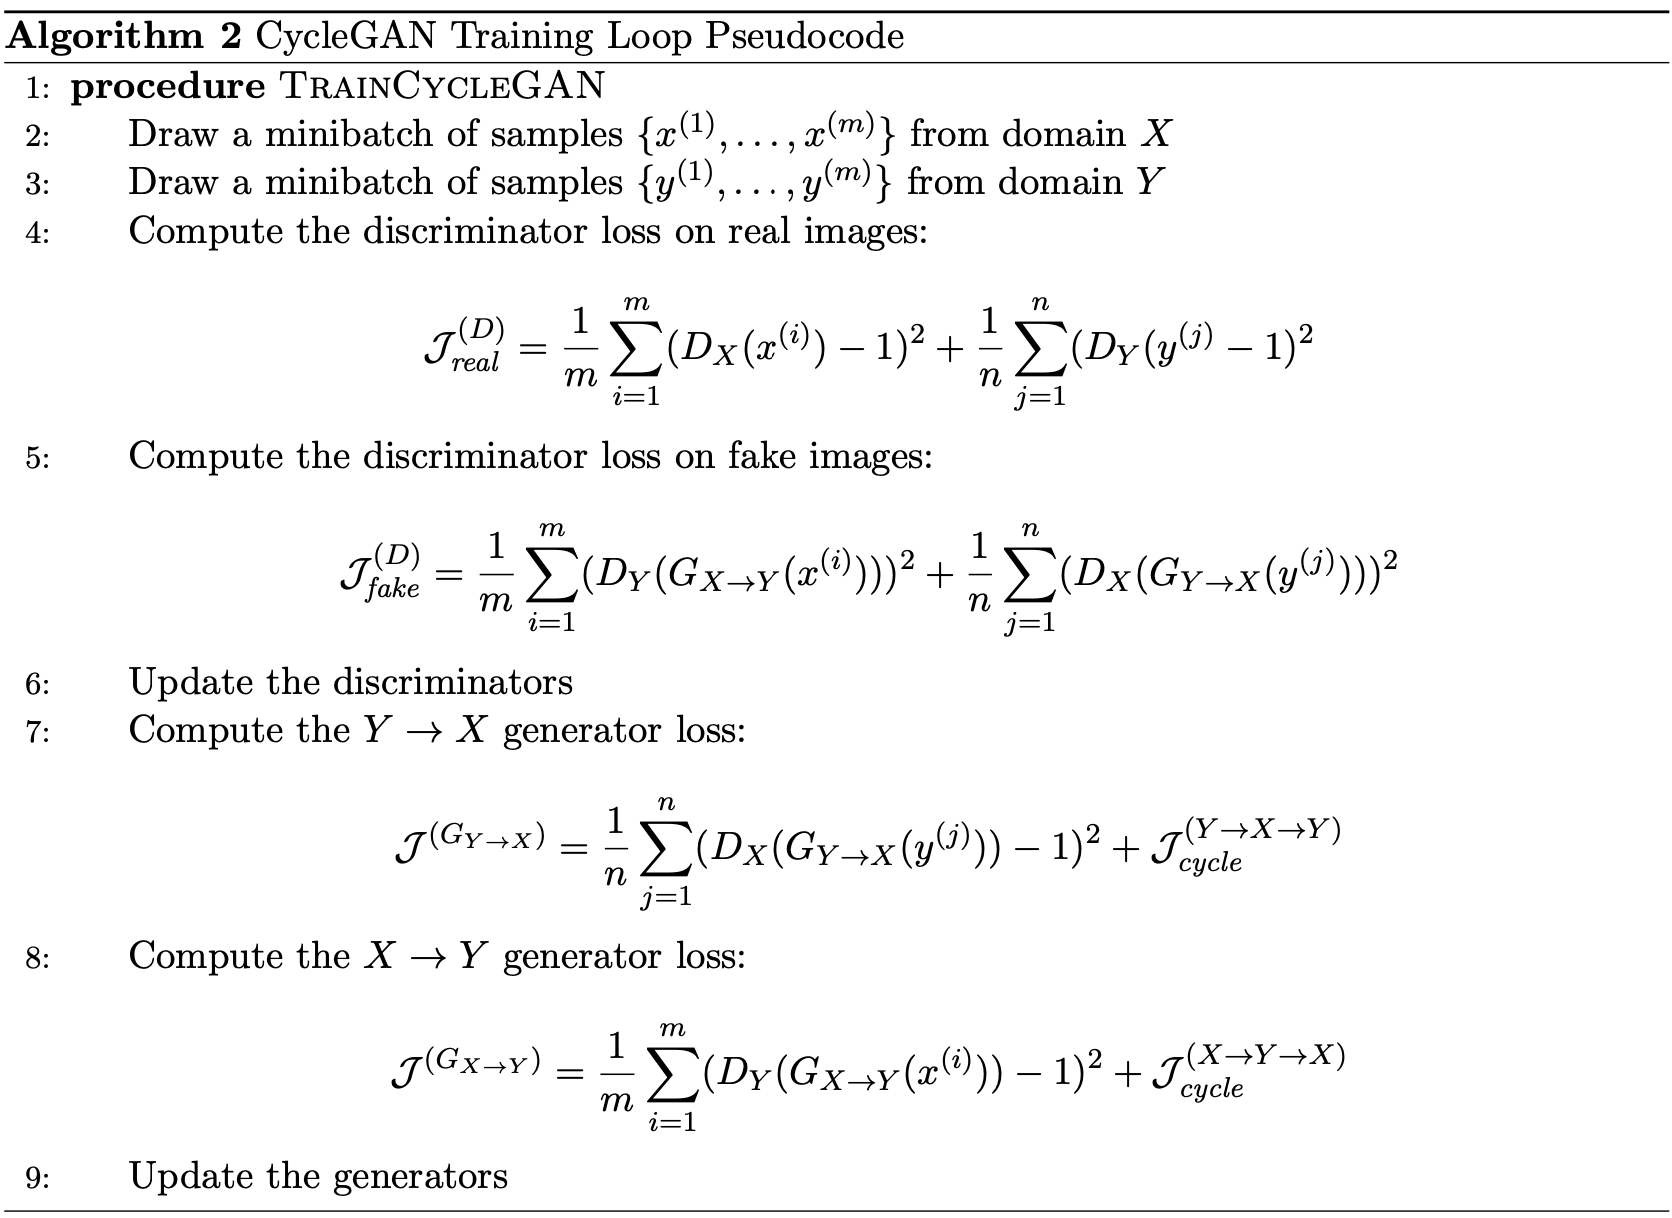
Similarly to Part 1, this training loop is not as difficult to implement as it may seem. There
is a lot of symmetry in the training procedure, because all operations are done for both X → Y and Y → X directions. Complete the training_loop function in cycle_gan.py, starting from the following section:
# ============================================
#            TRAIN THE DISCRIMINATORS
# ============================================
#########################################
##             FILL THIS IN            ##
#########################################

# 1. Compute the discriminator losses on real images
# D_X_loss = ...
# D_Y_loss = ...
There are 5 bullet points in the code for training the discriminators, and 6 bullet points in total for training the generators. Due to the symmetry between domains, several parts of the code you fill in will be identical except for swapping X and Y ; this is normal and expected.
Cycle Consistency [5 points]
The most interesting idea behind CycleGANs (and the one from which they get their name) is the idea of introducing a cycle consistency loss to constrain the model. The idea is that when we translate an image from domain \(X\) to domain \(Y\), and then translate the generated image back to domain \(X\), the result should look like the original image that we started with. The cycle consistency component of the loss is the mean squared error between the input images and their reconstructions obtained by passing through both generators in sequence (i.e., from domain \(X\) to \(Y\) viathe \(X \to Y\) generator, and then from domain \(Y\) back to \(X\) via the \(Y \to X\) generator). The cycle consistency loss for the \(Y \to X \to Y\) cycle is expressed as follows:
\[\frac{1}{m}\sum_{i=1}^m ||y^{(i)} - G_{X\to Y}(G_{Y\to X}(y^{(i)}))||_p\]The loss for the \(X \to Y \to X\) cycle is analogous. Here the traditional choice of \(p\) is 1 but you can try 2 as well if you vary your \(\lambda_{\text{cycle}}\).
Implement the cycle consistency loss by filling in the following section in cycle_gan.py. Note that there are two such sections, and their implementations are identical except for swapping \(X\) and \(Y\). You must implement both of them.
if opts.use_cycle_consistency_loss:
    # 3. Compute the cycle consistency loss (the reconstruction loss)
    # cycle_consistency_loss = ...
    g_loss += cycle_consistency_loss
CycleGAN Experiments [15 points]
Training the CycleGAN from scratch can be time-consuming if you do not have a GPU. In this part, you will train your models from scratch for just 1000 iterations, to check the results.
- Train the CycleGAN without the cycle-consistency loss from scratch using the command:
python cycle_gan.py --disc patch --train_iters 1000This runs for 1000 iterations, and saves generated samples in the
output/cycleganfolder. In each sample, images from the source domain are shown with their translations to the right. Include in your website the samples from both generators at either iteration 800 or 1000, e.g.,sample-001000-X-Y.pngandsample-001000-Y-X.png. 1. Train the CycleGAN with the cycle-consistency loss from scratch using the command:python cycle_gan.py --disc patch --use_cycle_consistency_loss --train_iters 1000Similarly, this runs for 1000 iterations, and saves generated samples in the
output/cycleganfolder. Include in your website the samples from both generators at either iteration 800 or 1000 as above. - If the previous looks reasonable, it is time to train longer time. Please show results after training 10000 iterations. Include the sampled output from your model.
- Also train on the apple2orange dataset. You can do this by setting the flag
--X apple2orange/appleand--Y apple2orange/orange. - Do you notice a difference between the results with and without the cycle consistency loss? Write down your observations (positive or negative) in your website. Can you explain these results, i.e., why there is or isn’t a difference between the two?
- Train the CycleGAN with the
DCDiscriminatorfor comparison:python cycle_gan.py --disc dc --use_cycle_consistency_lossCompare and report your observations between the results using
DCDiscriminatorandPatchDiscriminator. Can you explain the results?
Perform the comparisons of 4 and 5 on both the grumpifyCat and the apple2orange dataset.
What you need to submit
- Four code files:
models.py,vanilla_gan.py,data_loader.pyandcycle_gan.py. - A website submitted like the previous two assignments following the instructions here containing samples generated by your DCGAN and CycleGAN models, and your answers to the written questions as specified in the previous sections.
Bells & Whistles (Extra Points)
Max of 10 points from the bells and whistles.
- Get your GAN and/or CycleGAN to work on a dataset of your choice. You can curate your own dataset, or collect other datasets from repos like (1, 2, 3) (2pts).
- Apply spectral normalization (2pts) on your GANs for stability.
- Do something cool with your model: Generate a GIF video or create a meme using your model (You can add your text manually.)? Find directions in the latent space that can change the image in a meaningful way. (up to 4 pts)
- Train your GAN to generate higher-resolution images (up to 2 pts) They are available at this link.
- Find an improvement to the loss for DCGAN or CycleGAN and implement it (4 pts).
- Use a different type of generative model (like a VAE, PixelCNN, or flow-based model) for the same task (up to 8 pts)
- Your own ideas you have cleared with the TAs.
Further Resources
- Generative Adversarial Nets (Goodfellow et al., 2014)
- Generative Models Blog Post from OpenAI
- Unpaired image-to-image translation using cycle-consistent adversarial networks (Zhu et al., 2017)
- Official PyTorch Implementations of Pix2Pix and CycleGAN
Acknowledgement: The assignment is credit to Roger Grosse’s Toronto CSC 321 assignment 4.