Assignment #4 - Neural Style Transfer
Download: [attachment]
Late Policy
- You have free 5 late days.
- You can use late days for assignments. A late day extends the deadline 24 hours.
- Once you have used all 5 late days, the penalty is 10% for each additional late day.
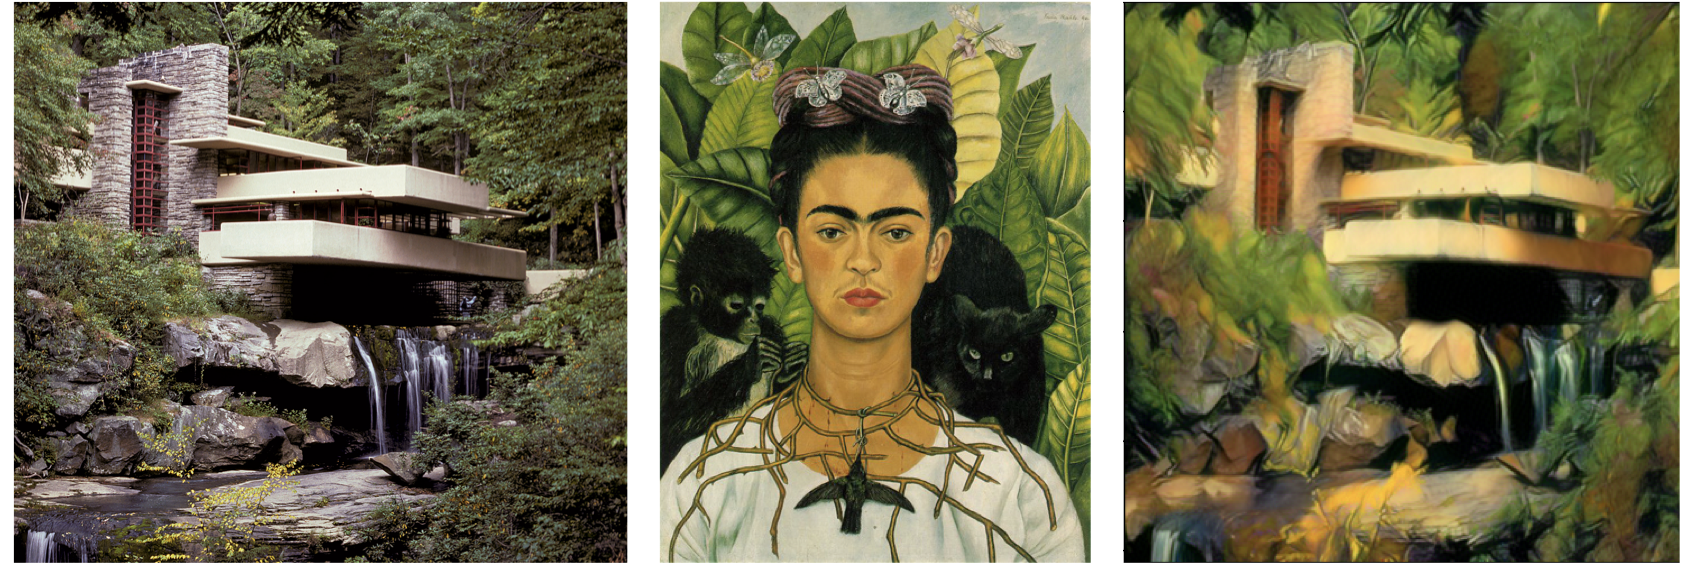
Content image (left): Fallingwater, place of interest near Pittsburgh. Style image (middle): the art Self-Portrait with Thorn Necklace and Hummingbird by Frida Kahlo Output (right): Frida-Kahlo-ized Fallingwater.
Introduction
In this assignment, you will implement neural style transfer which resembles specific content in a certain artistic style. For example, generate cat images in Ukiyo-e style. The algorithm takes in a content image, a style image, and another input image. The input image is optimized to match the previous two target images in content and style distance space.
In the first part of the assignment, you will start from random noise and optimize it in content space. It helps you get familiar with the general idea of optimizing pixels with respect to certain losses. In the second part of the assignment, you will ignore content for a while and only optimize to generate textures. This builds some intuitive connection between style-space distance and gram matrix. Lastly, we combine all of these pieces to perform neural style transfer.
Part 1: Content Reconstruction [30 points]
For the first part of the assignment, you will implement content-space loss and optimize a random noise with respect to the content loss only.
Content Loss: The content loss is a metric function that measures the content distance between two images at a certain individual layer. Denote the Lth-layer feature of input image X as $f_X^L$ and that of target content image as $f_C^L$. The content loss is defined as squared L2-distance of these two features $|f_X^L - f_C^L|^2_2$.
Implement content loss in the code:
class ContentLoss(nn.Module):
    def __init__(self, target,):
        super(ContentLoss, self).__init__()
        # you need to `detach' the target content from the graph used to
        # compute the gradient in the forward pass that made it so that we don't track
        # those gradients anymore
        # self.target = TODO
        raise NotImplementedError()

    def forward(self, input):
        # this needs to be a passthrough where you save the appropriate loss value
        # self.loss = TODO
        raise NotImplementedError()
    return input
Feature extractor and Loss Insertion: Of course when $L$ equals 0, content-loss is just an L2 pixel loss, which does not resemble content. The content loss is actually in the feature space. To extract the feature, a VGG-19 net pre-trained on ImageNet is used. The pre-trained VGG-19 net consists of 5 blocks (conv1-conv5) and each block serves as a feature extractor at the different abstract levels.
The pre-trained VGG-19 (vgg19) can be directly imported from torchvision.models module. You will be using the feature extractor of the model only (model.feature). You should also set the model to eval() mode. Write your code to append content loss to the end of specific layers (will be ablated soon) to optimize.
def get_model_and_losses(cnn, style_img, content_img,
                               content_layers=content_layers_default,
                               style_layers=style_layers_default):
    # just in order to have an iterable access to or list of content/syle
    # losses
    content_losses = []
    style_losses = []
    ...
    return model, style_losses, content_losses
Optimization: In contrast with assignment 3 where we optimize the parameters of a neural network, in assignment 4 we fix the neural network and optimize the pixel values of the input image. Here we use a quasi-newton optimizer LBFGS to optimize the image optimizer = optim.LBFGS([input_img.requires_grad_()]). The optimizer involves reevaluate your function multiple times so rather than a simple loss.backward(), we need to specify a hook closure that performs 1) clear the gradient, 2) compute loss and gradient 3) return the loss.
Please complete run_optimization and the closure function within:
def run_optimization(cnn, content_img, style_img, input_img, use_content=True, use_style=True, num_steps=300, style_weight=1000000, content_weight=1):
    """Run the image reconstruction, texture synthesis, or style transfer."""
    # get your model, style, and content losses

    # get the optimizer
    # opt = = LBFGS(...)
    def closure():
        # here
        # which does the following:
        # clear the gradients
        # compute the loss and it's gradient
        return the loss
    return input_img
Experiment:
- Report the effect of optimizing content loss at different layers. [15 points]
- Choose your favorite one (specify it on the website). Take two random noises as two input images, optimize them only with content loss. Please include your results on the website and compare each other with the content image. [15 points]
Part 2: Texture Synthesis [30 points]
Now let us implement style-space loss in this part.
Style loss: How do we measure the distance of the styles of two images? In the course, we discussed that the Gram matrix is used as a style measurement. Gram matrix is the correlation of two vectors on every dimension. Specifically, denote the k-th dimension of the Lth-layer feature of an image as $f^L_k$ in the shape of $(N, K, H*W)$. Then the gram matrix is $G = f^L_k (f^L_k)^T$ in the shape of (N, K, K). The idea is that two of the gram matrix of our optimized and predicted feature should be as close as possible.
Please implement the style loss and gram matrix in the code:
def gram_matrix(activations):
    a, b, c, d = activations.size()  # a=batch size(=1)

    # 'normalize' the values of the gram matrix
    # by dividing by the number of element in each feature maps.
    return normalized_gram

class StyleLoss(nn.Module):
    def __init__(self, target_feature):
        super(StyleLoss, self).__init__()
        # self.target = TODO

    def forward(self, input):
        # self.loss = TODO
        return input
Applying loss: Similar to part one, please insert the implemented style loss to the desired layers, which you will report their different effect at different layers.
Optimization: If you write run_optimization smartly, lots of code can be reused by setting the function argument as 0/1. Please modify those parameters accordingly in order to only optimize style loss.
Experiment:
- Report the effect of optimizing texture loss at different layers. Use one of the configurations; specify it in the website and: [15 points]
- Take two random noises as two input images, optimize them only with style loss. Please include your results on the website and compare these two synthesized textures. [15 points]
Part 3: Style Transfer [40 points]
Finally, it is time to put pieces together!
Applying Losses: The building blocks are almost ready. You need to insert both content and style loss to some certain layers.
Experiment:
- Tune the hyper-parameters until you are satisfied. Pay special attention to whether your gram matrix is normalized over feature pixels or not. It will result in different hyper-parameters by an order of 4-5. Please briefly describe your implementation details on the website. [10 points]
- Please report at least a 2x2 grid of results that are optimized from two content images mixing with two style images accordingly. (Remember to also include content and style images therefore the grid is actually 3x3) [10 points]
- Take input as random noise and a content image respectively. Compare their results in terms of quality and running time. [10 points]
- Try style transfer on some of your favorite images. [10 points]
What you need to submit
- Three code files and any necessary files to run your code:
run.py,style_and_content.py,utils.py. - A website submitted like the previous homework following the instructions containing samples of content reconstruction, texture synthesis, and style transfer.
- If you complete any Bells and Whistles, please point out at the top of your website.
Bells & Whistles (Extra Points)
Max of 10 points from the bells and whistles.
- Stylize your grump cats or Poisson blended images from the previous homework. (2pts)
- Apply style transfer to a video. You could try frame by frame method (2pts) or applying temporal smoothness for better output(4pts). Artistic style transfer for videos, Ruder et al. 2016
- Add some spatial control by masking out certain regions (4 pts). Controlling Perceptual Factors in Neural Style Transfer, Gatys et al. 2017 Sec 4
- Add histogram loss to make your results more stable (4 pts). Stable and Controllable Neural Texture Synthesis and Style Transfer Using Histogram Losses, Risser1 et al. 2017, Sec 4.3
- Use a feedforward network to output style transfer results directly (8 pts). You can use or modify the CycleGAN generator network used in HW3. Perceptual Losses for Real-Time Style Transfer and Super-Resolution, Johnson et al. 2016
- Use a feedforward network to synthesize texture (8 pts): You can use or modify the CycleGAN generator network used in HW3. Non-Stationary Texture Synthesis by Adversarial Expansion, Zhou et al. 2018
- Other brilliant idea you come up with. (5pts)